<---Previous =============== Next--->
Drivetrain
The drivetrain in my car consists of a Ford 289 V8 coupled with a Top Loader four speed that is linked to a 1972 Corvette rear end. The engine that was used for the initial series of test drives was a 1966 Ford 289 V8. Despite only a two barrel carb and a 3.33 rear end ratio, the engine had plenty of power and could easily burn rubber.
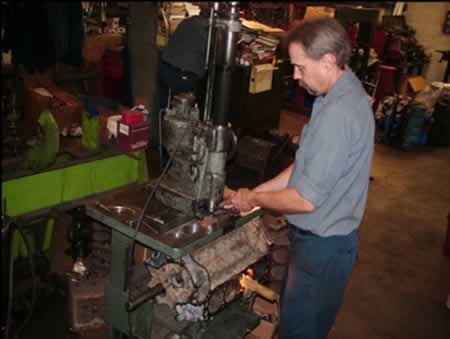
After over 20 years of work I figured my dream car deserved a dream engine. Instead of rebuilding my perfectly good engine, I was convinced to rebuild an engine that really needed it. A friend of mine had an old 1965 289 in his pole barn that fit the bill – it was a wreck.
The winter of 2005 was spent researching components, tearing down the engine, hauling it off to the machinist and, finally, reassembling. The following are details that gear-heads eat up. It won’t mean much to us regular folks.
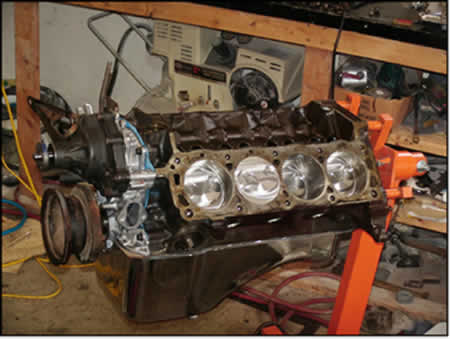
The New Engine
Displacement: 289 cubic inches
Pistons: Keith Black Domed hypereutectic alloy 0.030 over
Compression: 10:1
Rings: Sealed Power plasma-moly-coated ductile iron
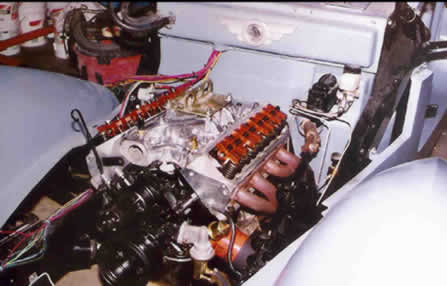
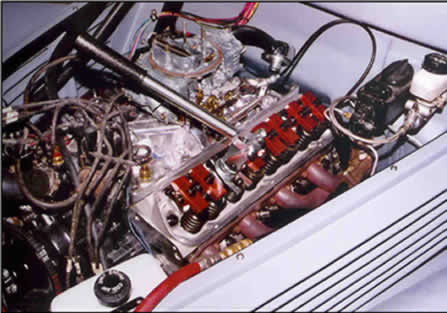
Heads: Aluminum Edlebrock Performer Series
Intake Valves: 2.02 inch diameter Stainless
Exhaust Valves: 1.60 inch diameter Stainless
Cam: Lunati Voodoo 60001
Intake 0.483 lift – 213° duration
Exhaust 0. 499 lift – 219° duration
Lifters: Lunati Hydraulic lifters
Rockers: Harland Sharp Roller
Timing Chain: Cloyes double roller
Intake manifold: Edlebrock Performer – polished aluminum
Carburetor: 4 Barrel Holley 570 cfm with vacuum secondary
Ignition: Pertronix Pointless Ignition with 40,000 V Coil
Exhaust: Cyclone headers with Thrush glass packs
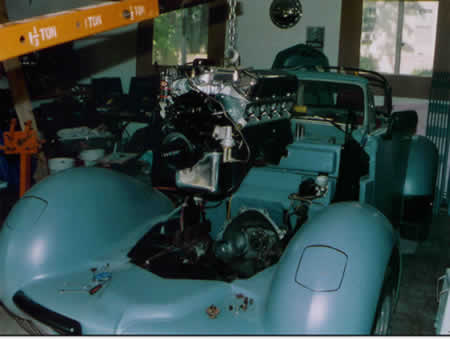
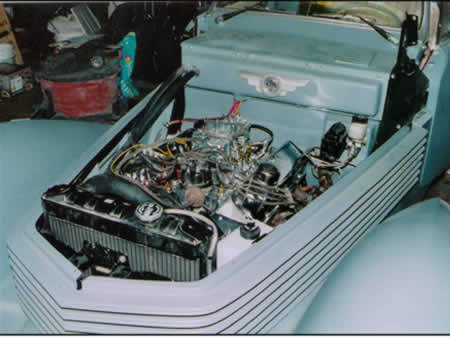
June 2006 the original engine was removed and the new engine that promised fire breathing power was installed. Before too long all the hoses and wires were installed and I was ready to fire it up for the first time. To document the momentous occasion I video taped the event. Unfortunately it was pretty uneventful.
The Problems Begin
Despite lots of cranking, the engine simply would not fire. I spent the next several hours verifying I had fuel, good spark and had the timing right. At one point I was convinced the distributor was 180 degrees off. I reoriented it and attempted to fire up the engine. After a bit of cranking there was a terrific explosion that left me with my ears ringing. The backfire blew off the wad of duct tape covering the hole for the PVC valve. Something was clearly wrong. I then took off all the valve covers to verify the compression stroke of cylinder #1 and oriented the distributor to point at the cylinder #1 spark plug wire.
At 10 PM I tried cranking again. Immediately the engine roared to life. There was great (but short) rejoicing.
The “run in” of a modern cam is critical. The run in occurs in the first 20 minutes of the engine cam’s life. This is when the interface of the cam and the lifters goes from an extremely high stress point contact to a low stress line contact. This process initially creates lots of friction and heat. To reduce friction and to carry away heat, cam manufacturers emphasize the need to provide the cam with a good supply of oil. This is done by immediately bringing the engine to 2000 to 2500 rpm upon start up.
Determined to follow the directions, I adjusted the carb to keep the engine going at 2000 RPM. It sounded great!
Before too long I noticed the engine appeared to be getting a bit warm. This seemed natural since is was a pretty hot day. I then noticed that my electric radiator fan had not yet kicked in. By then the engine was getting sort of hot. I touched the radiator – it was stone cold. The engine was now definitely getting hot. I decided to check to see if coolant was flowing. Upon removing the radiator cap there huge release of pressure followed by a spray of hot water. I then thought it might be a good idea to look at my engine gauges for the first time. The engine temperature was at 270 (this is extremely hot). I immediately turned off the engine; stepped back and contemplated what had just happened. I took off the radiator cap again and found I had no water in the radiator.
I realized that I had not put enough water into the engine – the ramifications were sickening to me. I let the engine cool and put in several gallons of antifreeze and water. Although the radiator was initially topped off, I believe as soon as the engine started, the water in the radiator was sucked into the empty engine where it stayed and got exceedingly hot. I theorized that the thermostat did not open because there wasn’t enough water to reach it.
I then restarted the engine and completed the run in process in about 10 minutes - noting the engine was running a bit warm – 230F and the valve trane was a bit noisy.
The following week, I talked to knowledgeable people about my run in experience and returned confident everything was fine. However, I was a bit worried that I might have scored a cylinder wall or warped a head due to the extremely high temperatures the engine saw at the run-in. As a check, I performed a compression test – all cylinders were at 150 psi (10:1 compression Wooo Hooo!).
The valve trane noise began to haunt me so I took off the covers and adjusted all the valves again. Some of them were surprisingly loose.
I then decided to take it for its first spin. Once on the road I noticed lots of valve trane noise and an irregular knock – somewhat heavy. It would come and go depending on if I was loading the engine. After talking with lots of folks it became apparent that there was something gravely wrong with my engine. I had to take it out and tear it all down.
Teardown
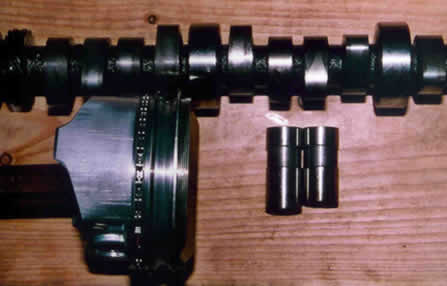
Teardown revealed surprising engine damage. One cylinder had a piston with a sticky wrist pin (the piston did not freely move on the wrist pin). The same cylinder had a scuffed wall. The cam had one lobe that was completely destroyed. Its corresponding lifter was discolored and was approximately 0.2 inches shorter than the others. Lots of metal was removed from these surfaces and metal went somewhere. I later found where. The oil pump and all the bearings were trashed.
The following things had to be done to the engine:
Block completely cleaned and scored cylinder wall honed
Piston wrist pin deburred and polished
New bearings installed
Ordered new cam and lifters
Ordered new oil pump
Ordered new water pump
I learned a lot from this experience and am willing to share it. Found out that the initial stresses at the cam/lifter interface can be extremely high. This stress can be reduced greatly by reducing the force that is operating against the lifter – the valve springs. Upon further investigation I learned that during run in the cam manufacture recommends not exceeding 100 pound preload on the valves (the force to begin to open the valves). The Edelbrock heads were measured at 120 pounds. Stiffer springs are essential if you want to operate the engine safely at higher RPMs but are very detrimental to the run in process.
Determined not to make any mistakes this time I decided to be very conservative and switched out the springs for very soft stock 289 (50 pound) valve springs. The plan was to replace the springs with the high performance springs that came with the Edlebrock heads after the successful run in.
Learning that stock valve springs were only 50 pounds made me realize why I had not learned about the critical nature of the run-in. Older engines do not push the design limits and are very forgiving. Modern high performance equipment, however, does push the design limits. Those limits cost me an extra $800.
The Transmission
The transmission was originally purchased in Maryland back in 1986 from a guy that raced cars that claimed the transmission was in fine shape. Fifteen years later I took it to a repair shop to have it checked out before putting it into the car. The repairman said it was pretty much trashed. Third gear was totaled – a clear sign it was raced and probably the reason it was sold. After about $700 in repairs, it was installed into the car for its maiden voyage. Everything seemed to work fine until I took it on the highway. There I found that third and fourth gear were swapped. To fix this, the third/fourth gear linkage was replaced with one with the correct geometry.
It might be argued that despite the bullet proof reputation of the top loader transmission, one if its weak links is the clutch mechanism. Thanks to advances in technology, the clumsy linkage system can be replaced with a precise hydraulic clutch system featuring a master cylinder on the firewall and a slave cylinder in between the throwout bearing and the transmission. I ended up buying a McLeod hydraulic throwout bearing through David Kee. Operation has been smooth and, so far, flawless.
Upon removal of the engine (for the second rebuild) I discovered that the transmission’s input shaft was barely engaging with the pilot bearing at the end of the crankshaft. Insufficient support from the pilot bearing likely will cause excessive gear noise, wear and premature failure. A friend of mine thought the shaft was too short for a 289 and was more like that for a 390 cid engine. A bit of research proved him right. To remedy the problem, I ordered a new input shaft – for a 289 wide ratio top loader – from David Kee. This arrived and was sent to the mechanic for installation.
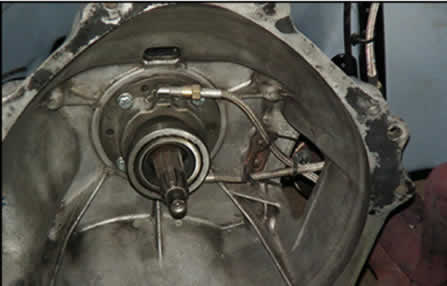
After the repair, I reattached the hydraulic throwout bearing and prepared the transmission for installation into the car. For one reason or another I spun the input shaft. To my surprize, there was a great deal of clunking. A bit of quick research indicated I ordered the wrong input shaft. I discovered that my transmission was not a wide ratio but a close ratio transmission (great for acceleration). A new input shaft was shipped in and, in short order, installed. Had I not noticed the input shaft error, I would have destroyed my transmission – I dodged a costly bullet on that one.
Run in # 2
The second run in started out like the first: a hot engine with unusual thermostat operation. This short lived phenomenon is believed caused by an air bubble located in the heater core that is positioned higher than the radiator.
Instead of running the engine for 20 minutes straight as specified by the cam manufacturers, this run in was broken into 5 minute segements with one hour cool downs in between. After 30 minutes the soft springs were replaced with high performance springs.
The waning weeks of summer were spent driving up the beautiful Mississippi river valley from Winona to Stillwater. The engine was pushed a bit at times, then pampered. All signs point to a healthy power plant. The ride was spectacular.
<---Previous =============== Next--->
Hosted by MagicWeb.us